Sunday 25 January 2015

8 Best Apps to Maximize Android's Performance

8 Best Apps to Maximize Android's Performance


Android isn't as controlled and regulated as its iOS competitor. No matter what version of the OS you're running, it's basically a tinkerer's dream. It allows users to tweak and optimize the system's performance from A to Z. From cache cleaner to junk file hunters, CPU overclocking tools and app disablers, here are eight Android tools that you can use to get more out of your system. 


1. Clean Master (Free) 

Cheetah Mobile's Clean Master comes with a Junk Files tool for cleaning your phone's app and system cache as well as temp files. It also sports a memory saving Phone Boost tool, an app manager and antivirus tool. While you can probably skip the task-killer-like features of Phone Boost, the Junk File tool is great at cleaning out widowed and temporary files, as well as cleaning out your system cache to free up phone storage. The app manager allows users to backup APKs, move apps to the SD card and uninstall apps. A surprising strong point is Clean Master's antivirus tool, which scored highly in AV-TEST's latest mobile antivirus survey.

2.DU Speed Booster (Free) 

Another comparable all-in-one Android optimization tool is DU Speed Booster, which comes with a Trash Cleaner for app cache and junk file cleaning, a one-touch accelerator, app manager, antivirus, a privacy advisor and built-in internet speed test. Again, the benefits of task-killing with accelerators are dubious, DU Speed Booster's junk file / cache cleaner is a great way to free up internal storage space, and the app manager and other tools are also solid extras.


3. SD Maid (Free) 

SD Maid is a storage maintenance app designed to free up space on your SD Card or internal storage by searching for widowed files and folders left behind by uninstalled apps. In addition, it also doubles as a file manager. The app is a great way to clean up some drive space, and is also great for periodic system maintenance. The free version is a perfectly serviceable app, but more options can be unlocked by purchasing an unlock key.

4. CCleaner (Free) 

Piriform's CCleaner is one of the best PC maintenance tools for Windows machines, and now, it's also gone mobile with an Android app that's the perfect tool to help you clean the crap out of your system. Like its desktop sibling, CCleaner for Android is a multipurpose cleaning tool that can clean out your application cache, download folders, browser history, and other temporary files, as well as optionally clean your call and SMS log selectively or in bulk. In addition to its fast, ad-free cleaning experience, CCleaner also comes with an app manager, CPU, RAM and storage meters, as well as battery and temperature tools.

5. CPU Tuner (requires root) (Free) 

CPU Tuner allows you to monitor and tweak your CPU's performance. Customize the settings for your CPU governor, underclock to save battery, overclock to improve performance, and set various trigger-based performance profiles to ensure your CPU performs just the way you want. Again, a little care and research as to what your hardware can tolerate is important, especially if you choose to overclock. Also, unlike similar applications (SetCPU, for example), CPU Tuner is free on the Google Play market.

6. 3c Toolbox / Android Tuner (requires root) (Free) 

3c Toolbox, formerly known as Android Tuner, provides users with a ton of diagnostic and tweaking tools that a savvy user can utilize to diagnose and improve the health of their system. The toolbox includes a task manager to manage (or kill) your apps, backup or restore APKs, CPU governor and voltage tweaks, system settings such as SD cache size or just view a wealth of diagnostic data. As with any app that tinkers with system settings, be careful of what you tinker with and do your research before changing anything.


 7. BetterBatteryStats ($2.89) (requires root)


While the Android settings menu provides users with some insight on battery status and how much energy is in use, technically oriented users can get far more comprehensive information with apps like BetterBatteryStats. Plus, BBS has good tools for tracking apps that do "partial wakelocks" that prevent the device from entering battery-saving sleep mode. If you suspect that some of your apps are chewing through your battery life or are preventing your phone from properly entering sleep mode, BBS can be a great tool to help.

8. Greenify (requires root) (Free) 

Greenify basically puts an app in a state of hibernation, unable to access system resources, bandwidth or run background processes. However, Greenify allows you to run an app normally in the foreground when explicitly called by the user without any extra fuss. If you've got memory or battery hogs that keep draining resources in the background, don't bother with a task-killer when you can just greenify it. Just don't do that to your alarm clock or messenger, unless you want them to stop working.


H-M

Saturday 24 January 2015

How to Flash a Custom ROM on the Samsung Galaxy S3

How to Flash a Custom ROM on the Samsung Galaxy S3

A custom ROM is a custom version of Android for your device. After you have rooted your device and flashed a custom recovery on it, you can then use the recovery to flash a custom ROM. Thanks to a sizeable community of developers, there are a lot of these third-party ROMs to choose from (depending on the device) and each one is unique. Developers usually give you the latest version of Android in their ROM, their own custom themes, options, and a ton of other customization options and enhancements.

In this procedure, we’ll show you how to flash a custom ROM on your Samsung Galaxy S3 (International).

After flashing a custom ROM on Samsung Galaxy S3 (International), you’ll be able to: 

  • Flash newer versions of Android that the manufacturer hasn’t provided yet.
  • Utilize different UI skins or stock Android(HTC’s Sense UI, Samsung’s TouchWiz UI, LG Optimus UI).
  • Increase performance
  • Increase battery life
  • More customization options than stock ROMs
Interested? Here’s how to flash a custom ROM on your Samsung Galaxy S3 :

1. Before You Begin


  1. You must be rooted to do this tutorial. Head to my another article of How To Root tutorial & Root Your Device .
  2. You must also have a custom recovery flashed on your device before doing this tutorial. Head to my article of How to flash a custom recovery (like CWM or TWRP) on Android find your device, and do the How to Flash a Custom Recovery tutorial listed for it there then return to this tutorial to continue.


    2. Choose a Custom ROM to Flash

    1. Head to ROM repository of Unlockr and choose your device.
    2. Choose a ROM of your liking.
    3. Click the download link in the ROM post to be taken to the developer’s page for that ROM.
    4. Search through the developer’s page for the download link for the latest version of that ROM (usually located in the first post in a forum or under Downloads).
    5. Save the ROM to your desktop of your computer.

    3. Flash the Custom ROM on your Samsung Galaxy S3

    1. Plug in your device to your PC using the USB cable.

    2. Copy the Custom ROM .zip file available on your desktop over to the root of your SD card.

    3. Once it’s been copied, unplug your device from your PC.

    4. Turn OFF your device.

    5. Turn it back on by holding down Volume Up, Home, and Power buttons together.

    6. Your device should reboot into recovery mode.
    In the recovery mode, the Volume buttons are used for navigation and the Power button to make a selection.

    7. Select Backup and Restore.

    8. Select Backup.

    9. Hit Yes when prompted and it should begin creating the backup of your device.

    10. Once the backup is created, head back to main menu by selecting Back.

    11. Select Wipe data/factory reset.

    12. Hit Yes when prompted and let it wipe off your device.

    13. Once done, select Back and you’ll be back to the main menu.

    14. Select install zip from sdcard followed by choose zip from sdcard.

    15. Navigate to the root of your SD card and choose the custom ROM .zip file you copied earlier to be flashed on your device.

    16. Select Yes when asked if you really wish to flash this custom ROM.
     
    17. It’ll start flashing the ROM on your device.

    18. Once the ROM has been flashed, select reboot system now and your device will reboot.

    19. You’re all done!

    H-M


How to flash a custom recovery (like CWM or TWRP) on Android

How to flash a custom recovery (like CWM or TWRP) on Android

If you have decided to take a trip to the land of custom ROMs and Android hacking in general, you’d need to take one first step - flash (install) a custom recovery. In this article, we explain what exactly is a ‘custom recovery’, how you install it, and what are some popular solutions.

Let’s start with the fact that every phone ships with stock recovery software. Stock recoveries vary slightly between phone makers, but they are identical in their essence - they allow you to manually flash official updates and clear your phone’s cache. Sounds limited? It is, and that’s why custom recoveries exist.

Custom recoveries that we’ll flash here replace the limited stock ones, adding all sorts of functionality to your phone. Flashing a custom recovery is often a key part of the rooting process, but that is not its only use. Here is a short summary of all that you can do with a custom recovery:


  1. Create and restore a backup image - A backup image makes a copy of all your phone settings, application and app data. Such a backup copy is crucial if your hacking experiments fail - in such cases, you can use the created backup image to restore your phone to a fully functional earlier state without losing any data. 
  2. Flash custom ROMs - custom ROMs can completely overhaul the looks and functionality of an Android smartphone, and usually they are the main reason for first flashing a custom recovery.

How to flash a Custom Recovery

Now that you know what a custom recovery is and what it does, it’s time to go through some popular names of recovery software. ClockworkMod (shortened to CWM) and Team Win’s Recovery Project (commonly referred to as TWRP) are the two most popular solutions, and while the two differ slightly, they both have the essential features you need.

Pre-requisites:

  • USB drivers for your phone must be installed on a computer. You can grab them from the official website of the company that made the phone. Get the latest:

Samsung Android USB drivers here
HTC Android USB drivers (included in HTC Sync) here
LG Android USB drivers here (go to “Software updates” > Select your phone > Click on “Install USB Drivers”)
Sony Android USB drivers here
Motorola Android USB drivers (included in Motorola Device Manager) here


  • Download the latest version of either CWM or TWRP (we prefer CWM, but both work equally well). For CWM go to this website, find your device, and download the image for it: 

Download CWM here
For TWRP go to this website, click on “Get TWRP for your device” and type you device's name to download the image for it:
Download TWRP here

  • Your phone must be connected to your computer via USB. If you get stuck at some point in the tutorial, a common fix is to try disconnecting the phone and re-connecting it again.  
 

Enable USB debugging on your Android device. Connect your phone to a computer via USB.

Don’t worry, all you’d need to do is copy and paste some code in it, it's not hard at all. To open the terminal in Windows 7, hit the ‘Windows’ key, type ‘cmd’, and hit Enter; in Windows 8, you’d need to navigate to the new Modern UI home panel, and just type in ‘cmd’ there.

Once you open the terminal, you need to change the folder to Platform Tools in the Android SDK. Typically, it looks something like this, but you have to find the exact path where you installed the Android SDK on your computer:
C:/Android SDK/adt-bundle-windows-x86_64-20131030/sdk/platform-tools/
To change the folder you just copy the above path (as it is on your computer) and put ‘cd’ in front of it, so the whole command would look like so:
cd C:/Android SDK/adt-bundle-windows-x86_64-20131030/sdk/platform-tools/


Enter the following:
adb devicesMake sure your device is listed.
Next, type in:
adb reboot bootloaderWait for the phone to reboot in bootloader mode .


Now, go to the platform-tools directory (a sub-directory of the Android SDK), and open Command Prompt there (you can do so by Shift + Right-click > Open Command Prompt).

In the command line, enter the following:
fastboot devicesMake sure that your device is listed.

Finally, type in:
fastboot flash recovery FILE.IMGReplace ‘FILE.IMG’ with the recovery you want to flash. We have given you links for CWM and TWRP at the beginning of the of the article, but if you've missed them, you would need to download them now from the following links:
Download CWM hereDownload TWRP here
Here’s how that recovery file name typically looks (this is the image for a Moto G):
cwm-6.0.4.6-MotoG4.4.img
cwm-6.0.4.7-MotoG-GPE-4.4.img
twrp-2.6.3.1-MotoG4.4.img

After you have flashed the recovery, it is crucial that you you don't just reboot your device. Go to ‘Recovery’ by using volume down to scroll. Don’t scroll using the Volume Up button! In this case, Volume Up serves as the ‘Select’ button. Once you have gone to ‘Recovery’, only then press the Volume Up to boot in recovery mode.

If you don't follow these instructions, your device will simply re-flash the stock recovery, and you’d have to start all over with the custom recovery flash process.
And voila, that’s it! You now have custom recovery flashed on your phone, congrats!

Note: You can use this how-to tutorial guide to install custom recovery on phones like the Samsung Galaxy S5, Galaxy S4, Galaxy S III, Galaxy Note 3, Galaxy Note 2, HTC One (M8), LG G3, LG G2, Moto X, Moto G, Sony Xperia Z2, Xperia Z1, etc.

H-M 

Root Your Android Phone or Tablet – Fast & Easy Methods

Root Your Android Phone or Tablet – Fast & Easy Methods


Why should you root android phone or tablet

Now we tell you some benefits of rooting. If you need these benefits only then
root android phone or tablet otherwise no need to do this. Here they are.
  • You can remove manufacturer installed or carrier installed applications which you are not going to use ever.
  • Allow you to run applications like firewall and many other that is impossible on unrooted phone.
  • Customize phone look according to your wish and installing themes.
  • You can flash custom ROMs which help in increasing you phone performance and also you can update to latest android version which is not yet released for your handset.
  •  Rooting allows wireless tethering.
  • Or See My Another Article on Everything You Need to Know About Rooting Your Android Phone
  • & Top 10 Reasons to Root Your Android Phone
What are backdraws of rooting

  • It will void your device warranty. But you can unroot your device to get it back.
  • Your android device is no more immune to security threats.
  •  Risk of bricking your device during rooting. But its chances are zero percent if you follow proper instructions.

Rooting Your Android Phone or Tablet – Fast and Easy Methods


Here we discuss two methods of rooting that are fast and work with most of android devices. 

Important: Backup your android device before rooting.

Root easily using Unlock Root software

  1. First of all download Unlock Root software on your computer. Download free version because it works for most of the devices.But if you want premium version get it from here .
  2. Now run setup to install this software on your computer.
  3. After installation run the software.
  4. Now connect your android device to computer using USB cable and then install your device drivers. If you don’t have drivers then you can download these from internet.
  5. Now go back to software and search for “root” button and click on it.
  6. After clicking you see a list of devices. Find yours and select it.
  7. Now start rooting and software will tell you when its complete by a confirmation message.
  8. After successful completion disconnect your android phone or tablet from computer.
  9. Now restart your device and you have done.

 Root android devices without using computer – fast one click method

  1. Download the framaroot application from here in your PC and transfer it in your phone using datacable or SD card. Or directly download in your android phone or tablet.
  2. Now install it in your android device by running APK file you just downloaded.
  3.  Now run this application and select option “install superuser”.
  4. After this a list of exploits appears, select one of them and wait until it complete its work.
  5. If it shows “success” message then you rooted your android device successfully. So now restart your device for the changes to take effect.
  6. If it shows “failed” message then try other exploits in the list.
NOTE: You can also unroot using this application. 

 H-M

Friday 23 January 2015

Five Best Android ROMs

Five Best Android ROMs
 
Whether you're looking to upgrade an Android device forsaken by its manufacturer or you just want more control over the phone or tablet you own, you've probably gone looking for a new ROM. Rooting your phone is the first step, but a new ROM will give you a completely new mobile OS, and this week we're going to look at five of the best Android ROMs, based on your nominations.
We're back to highlight the top five. It's important to note that not every ROM is available for every device, and different ROMs are aimed at different audiences—some of them are designed to upgrade the OS and others are lean and mean installs to speed up your phone. Whichever you choose, you'll have to make sure your device is supported by the developers behind the ROM before installing.
 
 
CyanogenMod

CyanogenMod is arguably one of the (if not the) most installed Android ROM in the world, and for good reason. It offers a ton of great features, is available for more devices than most other ROMs of its type, and has the type of polish and support that makes it easy to fall in love with. There are builds of CyanogenMod for Android phones and tablets, and slowly but surely the developers behind CyanogenMod are rolling out Ice Cream Sandwich versions for devices whose manufacturers have given up on upgrading the device entirely. To boot, CyanogenMod includes features you won't find in stock Android, like support for OpenVPN, support for downloadable themes, more privacy tools, and more. You can find a list of supported devices here. 


The Android Open Kang Project (AOKP) is a relative newcomer compared to many of the other popular ROMs already available, but it's rapidly growing in popularity. It offers many of the features that CyanogenMod has, and at first blush you may mistake one for the other, but as soon as you start looking at the options and add-ons, you'll see the differences. AOKP has earned high marks for add-ons and tools that you can't get in CM, centralized control over ROM options, and overall more customization options than CM. At the same time, its development community is smaller and it may not have the same polish and device support that CyanogenMod has. Still, it's super-fast, it's stable, and definitely worth a look. You can find a list of all supported devices here

 
MIUI struck us with how beautiful the user interface was and how elegant it made Android look and feel. It's not the most feature-packed or hackable ROM, but it's definitely one of the most customizable and elegant, and it's seriously fast. MIUI started life as a modded version of Android localized in China, but fans of the mod have since localized it for dozens of languages and countries. It offers strong theme support, beautiful stock apps, customizable lockscreens, support for GApps, and complete root access. You're not going to get a wealth of niche features here, but you will get a device that's much easier and more fun to use once you install MIUI. You can find a list of supported devices here. 


If you have a Galaxy Nexus, Nexus S, Samsung Galaxy S or Galaxy S II, Slim ICS may be the ROM for you. Not only will Slim ICS bring your device up to Ice Cream Sandwich, it's also a super-thin, lightweight installation that's remarkably easy to install, even though it's clearly aimed at advanced users. Slim ICS already has GApps rolled in, so you don't need to install them later. Where other ROMs try to add tons of new features and tweaking options, Slim ICS is designed to trim the fat down to the bare essentials and give you a fast and clean ICS installation. It's only available for a handful of Samsung devices and there's pretty much one developer and a few beta testers behind the scenes, so don't expect a ton of feature additions or new devices, but it is updated weekly and sports a good number of third-party mods. 


Liquid Smooth ROMS are available for multiple devices, and while the project started off with the Motorola Droid, Droid 2, Droid X, Droid Incredible, and HTC Thunderbolt, it's also available for the Galaxy Nexus and a few other devices, although you'll have to poke around the forums a bit to find them. The banner feature of Liquid is that it's probably one of the fastest ICS ROMs available, faster even than the stock install that comes on the Galaxy Nexus. You don't sacrifice features for the speed, but the overall size of the ROM is still nice and small, leaving more space for the apps and features you choose to use, as opposed to ones forced on you. GApps are baked right in, and the ROM offers theme support so you can customize it to your liking. All in all, if you have a supported device, it's probably the leanest, meanest ICS ROM you can download. 


Have something to say about the nominees that we missed? Did your favorite not get enough nominations to be included? Remember, the top five are based on your most popular nominations from the call for contenders thread from earlier in the week. Share your thoughts in the comments below.

H-M

How to Flash a ROM to Your Android Phone

How to Flash a ROM to Your Android Phone


Android is great, but sometimes, the version you get with your phone—whether its vanilla Android or something like Samsung's TouchWiz—leaves a bit to be desired. Here's how to install a new version of Android (or ROM) on your device for an even better Android experience.

What's a ROM?

One of the best things about the openness of the Android platform is that if you're unhappy with the stock OS, you can install one of many modified versions of Android (called ROMs) on your device. A new ROM can bring you the latest version of Android before your manufacturer does, or it can replace your manufacturer-modded version of Android with a clean, stock version. Or, it can take your existing version and just beef it up with awesome new features—it's up to you.

If you're familiar with Linux, it's sort of similar to installing a different Linux distribution. Each version of the OS has a specific goal in mind, and as such differs quite a bit from the others. Which one you choose is dependent on your priorities and how you use the device. You'll need to unlock your bootloader and flash a custom recovery but once you get the hang of it, it's not too difficult.

There are a lot of different ROMs out there, and if you're looking for a place to start which compares a ton of ROMs feature-by-feature, which is a great way to find the right one for you. Even if you have a Nexus phone with pure stock Android, ROMs are a great way to add new features and conveniences to Android.

Step One: Unlock Your Bootloader and Flash a Custom Recovery


First, let's clear up some confusion: Contrary to popular belief, you do not actually need to root your phone to flash a ROM—you just need to unlock your bootloader and flash a custom recovery. However, this process usually goes hand-in-hand with rooting—and most custom ROMs come with root access—so what you think of as "rooting your phone" is probably what you're going to have to do first.

Unfortunately, we can't go through this step in detail here, because it's different for every phone! So, I highly recommend what all the different terms mean, and what to watch out for. Then, search around sites like XDA Developers for instructions on how to unlock the bootloader of your specific phone, which recovery you should use (usually TWRP or ClockworkMod), and how to flash it.

I also recommend rooting your phone during step one, since it'll make the backup process in step two easier—and save you some hassle along the way. A lot of methods and one-click apps will root your phone anyways, so it might be included in the process. Again, this can vary from phone to phone. (If the instructions require you to flash SuperSU.zip, you can refer to step three of this guide for info on how to do that—ironically, it's just like flashing a ROM).
NOTE: Unlocking your bootloader will most likely wipe your phone, and without root access, you won't be able to back up very much. So, save anything you want to keep on your computer—you will have to set up your phone from scratch just this once before continuing.

When you're done, return here and continue to step two for the rest of the ROMming process.
  
Step Two: Make a Backup of Your System, Apps, and Data

Now that you've got a custom recovery on your phone, the first thing you should do—before you ever make a big change to your system—is back it up. First, we'll make a Nandroid backup, which is basically a image of your current system. That way, if something goes wrong, you can restore your phone to exactly the way it was before you started tweaking. This will save you a lot of hassle if something goes wonky (which, let's be honest, can happen often). To do this:


  1. Reboot your phone and enter recovery mode. This is a bit different on every phone, but usually involves some permutation of pressing the power and volume buttons at the same time.
  2. Head to the "Backup" or "Nandroid" section of your recovery mode. The default settings should be fine. If given the option, give your backup a name that helps you remember what it is (like "Pre-CyanogenMod Backup 01-17-14"). Confirm your backup and let it run.
  3.  Wait for the backup to finish. This may take a while. 


I also recommend making a second type of backup: your apps and settings. If you just unlocked your bootloader and wiped your phone, you can skip this step, but any time you flash a ROM in the future, you'll want to back up your apps first, since you may have to wipe your phone before you flash. With a backup, you can easily restore those apps and data after flashing, making the process a lot simpler. I recommend using Titanium Backup. 


This is different from a Nandroid backup because it just backs up the apps themselves, which you can then restore on any ROM you want. Nandroid backups take your entire system as it is, ROM included.

Note that you'll need to be rooted to use Titanium Backup (which is why I recommend you root in step one). To perform a backup in Titanium:

  1. Open Titanium Backup and grant it root permissions if it asks for them. If it experiences any problems with root, it'll tell you right now.

  2. Tap the "Batch" button in the upper right-hand corner (the one that looks like a little checkbox). Scroll down to the "Backup" section and find "Backup All User Apps." Tap the "Run" button. This will back up any apps you've downloaded from the Play Store, and their data. (You can try backing up your system data as well, but I find this usually doesn't work very well).

  3. Wait for it to finish. If you like, you can also sync these to Dropbox but you don't have to for this process.

    This may seem like a lot of unnecessary backups, but trust me: it's going to save you a lot of time in the long run. Now if something goes wrong, you have a nandroid backup to fall back on and don't have to start from scratch. And, when your ROM flashes successfully, you don't have to start re-downloading and setting up all your apps yourself because you can restore them with Titanium.

    Step Three: Download and Flash the ROM of Your Choice

    Now comes the fun part: flashing your ROM. First, obviously, you need to find the ROM you want. Again. You may want to poke around sites like the XDA Developers forums to see what's available for your particular phone.

    When you've found a ROM you want to try, download it and save it to your phone. It should come in the form of a fairly large ZIP file, so you'll probably want to be on Wi-Fi to download it. You can either download it directly from your phone, or download it on your computer and transfer it over via USB.

    To Flash Your ROM:

    1. Reboot your phone into Recovery mode, just like we did back when we made our Nandroid backup.  

    2. Head to the "Install" or "Install ZIP from SD Card" section of your recovery.

    3. Navigate to the ZIP file you downloaded earlier, and select it from the list to flash it.

    4. Wait for the process to complete; it may take a few minutes.

    5. Depending on your situation (see below), you may also need to wipe your data and/or cache. In TWRP, you'll find this under the "Wipe" section, and in ClockworkMod, you'll need to either choose the "Wipe Data/Factory Reset" option or the "Wipe Cache Partition" option. When you're done, you're free to reboot into your new ROM.

      So, when should you wipe your data and cache? Here are a few general guidelines:

      If you're flashing a ROM different than the one you're currently running, you should wipe data and cache. Essentially, this performs a factory reset on your phone, and you will lose all your data. 

      If you're flashing a new version of a ROM you're already running, we recommend wiping your data and cache—but you should be able to get away with just wiping the cache, meaning you get to keep all your apps and settings.

      Remember, if you backed everything up with Titanium, then doing a factory reset isn't all that bad, since you can just restore most of it. Keep in mind that even if you're just upgrading your existing ROM, factory resets can be helpful. If you only wipe your cache, note that a few apps may run into issues, but reinstalling them or wiping that app's data usually fixes the problem.

      When you reboot, you should be in your shiny new ROM, ready to play! But what? There's no Play Store? Read on for the last step of the process...

      Step Four: Download and Flash Google Apps


      Because Google's apps are not open source, custom ROMs can't bundle Google's apps—like Gmail, Hangouts, or the Play Store—with their ROMs. That means you'll need to download and flash them separately. Luckily, this is pretty easy to do: just head to this page on RootzWiki to find out which ZIP file you need, download it to your phone, and flash it just like you did the ROM in step three. Gapps Manager is also a great app that'll help you find the right package if you're stuck, and you can download the APK from XDA Developers.

      Once you've flashed the latest Google Apps package, you should be all set! You'll have a new ROM with tons of settings to play with, the Play Store to download new apps, and—if you made a backup with Titanium—you can now head into Titanium Backup and restore all your apps and their settings. Enjoy!

      H-M


How to Speed Up Your Old or Sluggish Android Device

How to Speed Up Your Slow or Sluggish Android Device


Whether you're resisting the temptation to upgrade to newer, faster hardware, or a year's worth of use has made your Android phone feel slow and laggy, here are some ways to make your older phone run a bit smoother. 

This guide provides a number of tips you can use to speed up your phone, and while not every tip will apply to you or your phone, you should find at least a few tips in here that will. Whether you've rooted your phone, overclocked, flashed a new ROM, or none of the above, you'll be able to take advantage of a number of the tweaks below to get your phone from sluggish and glitchy to 
quick and smooth. 

Everyone's phone is different, too, so note that some of the more advanced tweaks may take a bit of trial and error on your part. I've experienced good things with these tweaks on my Motorola Droid (which, yes, had gotten pretty darn sluggish and glitchy, even for a barely year-old phone), but I'll note where a different approach to a specific tweak will help owners of older or more underpowered phones. Users with newer phones (like the Droid Incredible or Galaxy S) may not need these tips as much, but I've heard from several sources that even speedy phones like those have benefited from these tips, so they're worth playing around with no matter what phone you have.

If You Haven't Rooted Your Phone

There are a lot of great tweaks out there for rooted phones, but there are a ton of really simple things you can do to speed up your phone, even if you haven't done any hacking whatsoever.
  
Try a New Home Screen Launcher

The benefits of other home screen launchers on more than one occasion, but I can't stress how great of an upgrade this can be. As always, I'm a huge proponent of LauncherPro, as it will not only bring you a noticeable speed increase upon installing it, but it also has lots of advanced features we can tweak to boost our speed even further (more on that later). Of course, ADWLauncher is also very popular, and the Android Market is rife with other options.

I'm going to write the rest of this tutorial from the perspective of a LauncherPro user, since from what I've seen, it has the most speed-boosting options, but you should be able to find many of the settings I mention below in other launchers, too—I'll note where a few of them are along the way, but you may have to do some poking around of your own depending on what Launcher you're using.

Lower the Number of Home Screens You Use And Ditch Those Widgets

If you have an HTC phone with the exclusive Sense UI and you'd rather not ditch it for something like LauncherPro, that's fine—you can still put this tip into practice. While some phones, like the Motorola Droid, come with a mere three five home screens, many (including most HTC phones) come with up to seven. While this is pretty handy if you like lots of icons and widgets (which I'll mention again in a moment), they can really take up a lot of memory on your phone, which can cause jerky animations, lag, and force closes.


It's fine to have lots of home screens, icons, and widgets, but if your phone isn't performing up to your standards, you may have to compromise and try using fewer home screens (or at least find a middle ground). I went down from seven to three home screens and haven't looked back—the jump in performance was pretty incredible.

If you're using LauncherPro, you can pick your number of home screens by hitting the Menu button on your phone, tapping Preferences, then tapping Homescreen Settings. If you're sticking with your stock launcher, you may not have the option to actually decrease the number of home screens, but you can still benefit by removing some icons and widgets from two to four of your home screens. It probably won't give you as big of a benefit as getting rid of the screens entirely, but those widgets can still suck up tons of memory, and deleting them from your home screen should make your phone run noticeably smoother
  
Uninstall Misbehaving Apps


When we discussed the myth of Android task killers, we mentioned that one of the real problems with slow phones is running poorly coded apps—apps that use up too much CPU in the background.Watchdog is still a great way to keep track of those apps: if something is constantly running in the background, it may be causing some of the performance hits on your device. Unless it's something you can't live without (and are thus willing to live with any slowness it might cause), uninstall it and find an alternative.
Note that some of the worst offenders in this category are apps that come pre-installed on your phone. Unfortunately, you need to be rooted to uninstall these, but we'll talk about that in a bit.

Uninstall or Move Apps to Free Up Space

It's also worth mentioning that even if an app doesn't misbehave (heck, even if you don't run it at all), it can cause slowdowns on your device. Believe it or not, the more free space you have in your phone's internal memory, the faster your phone can write to the disk. If you aren't sure how much free space your phone has, you can check it by going to Settings > SD Card & Phone Storage to see. You can also see which ones are taking up the most space by going to Settings > Applications > Manage Applications, hitting Menu, and sorting them by size. If you find you aren't even using an app that's hogging space, you might as well uninstall it—no point in keeping it around just so it can slow down your phone.


Your other option is to use the ever-handy Apps2Sd to move some of those apps off your phone's internal storage and onto your SD card. By default, the developer of a given app usually decides whether an app will install to your SD card, but with the App 2 SD app, you can do it yourself. Just pop open the app, and you'll get a list of apps that are on your internal storage that have the ability to move to the SD card. Just move them over to free up space.

Tweak Your Launcher's Memory Usage

If you really want to dig into your system's settings (or you compromised on that "use fewer home screens" tip), there are a few more advanced tweaks you can make to your launcher that should help it run a bit smoother.


If you're using LauncherPro, hit the Menu button and go to Preferences > Advanced Settings > Memory Usage Settings. While you can tweak the Advanced Settings to your liking, the easiest way to take advantage it to use one of LauncherPro's many Memory Usage Presets. These presets tweak different settings to fit the needs for different people and different phones. You can read more about these settings on the LauncherPro blog, but here's what you really need to know:
Note that there are now more than three presets, but the general premise remains the same. If you're still filling up your home screen with icons and widgets, you might want to try out a setting on the low end of the list. If you've taken my advice thus far, I can tell you High mode will give you a pretty nice performance boost.

One great thing about LauncherPro is that if you go to Preferences > Advanced Settings and check Display Memory Usages, you'll be able to see how much RAM is being used at any given time. This is a good way to tell whether you have RAM to allocate to these different things, or whether the amount of RAM is too small to let LauncherPro keep trying to use it all up.

If you're using ADWLauncher, you won't have nearly as many choices, but I would still recommend going into ADW's settings, hitting System Preferences, and playing around with a few of the features there like Scrolling cache and System persistent, which should perform similar tasks (albeit not as well as LauncherPro or CyanogenMod's similar settings, which I'll talk about in the section for rooted phones).

If You've Rooted Your Phone

If you've taken the plunge and rooted your Android device, you have a few more options available to you that should help you eke some extra speed out of your device. Note that these are a bit more advanced (as would be expected with root-only options), and require a bit more care, so be sure to backup your phone before you make any huge changes to it in case anything goes wrong.

Install a Custom ROM

Still one of the best reasons to root your phone is to install a custom ROM, not only for the neat features it brings but for the speed increases it can bring your phone. We've gone through the details of installing custom ROMs before, so I won't go too deeply into it here, but I do recommend it if you need some speed increases, especially if the ROM is based off a later version of Android than your phone currently has. Lots of phones are still stuck with 2.1 and earlier, and while some ROMs can run a bit slower than stock Android on some phones, the speed increases Android 2.2 brings likely outweigh them.


Many ROMs are built for speed and stability, and while you'll get a great performance boost from them, I've found that even with a ROM like CyanogenMod I've been able to eke some good performance out of my phone (especially by tweaking some of CyanogenMod's advanced features). So don't think that you have to choose a ROM like Bugless Beast just because you have an old phone. Of course, trying a few different ROMs is always a good idea to see what works best for you.

Overclock Your Phone's Processor


A surefire way to get a speed boost out of your old, underpowered phone is to overclock it.I will remind you that to overclock, you'll need to install a custom kernel. These are specific to your device, so you'll have to do some googling for compatible overclocking kernels to find one that's right for you. Generally, kernels are organized by two things: voltage and clock speed. The higher clock speed you choose, the more likely you'll need a higher voltage kernel (which, by the way, will drain battery faster). As long as you're not going overboard with the overclocking, you should be able to get by with a low or standard voltage kernel without a problem.

Uninstall Crapware


If your phone came pre-installed with all sorts of applications that you don't need, you can unisntall them with an app called Titanium Backup. Once you've downloaded it, just open it up and hit the "Backup/Restore" button at the top of the screen. Tap the app you want to get rid of. You'll probably want to back it up first, in case it ends up being integral to your phone's operation, but once you have you can uninstall it from the same screen. Alternatively, you can just freeze the app, which won't free up space on your phone's memory, but will keep it from running in the background and slowing your phone down. Note also that, like all these root-only options, you could seriously mess up your phone if you go too crazy, so maybe a full-phone backup is also a good choice here.

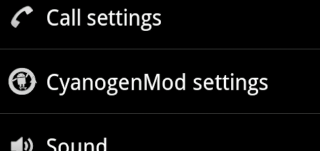
Play With Your ROM's Advanced Settings

This is one of the most difficult tweaks to perform on your phone, because it varies so much from person to person what works best. Furthermore, some ROMs may not have these settings in their preferences—you may have to do some terminal work to enable them. I'll go through what they are, and point out their location in the CyanogenMod ROM since it's the most popular and widely available, but if you don't have them in your ROMs settings you may have to do some googling to find out how to tweak them. That said, here are some of the handier features.


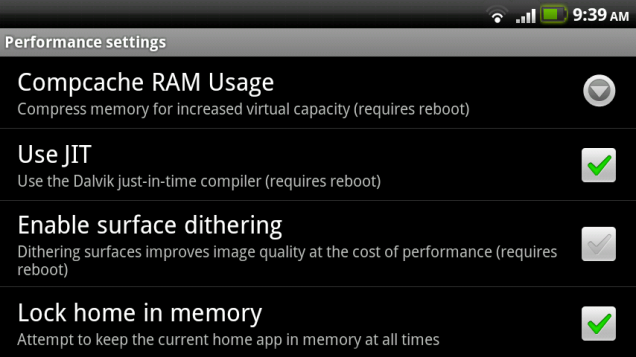
Compcache: Compcache is essentially virtual swap space in your RAM. In a nutshell, it gives you "more" RAM, but it's a bit slower than regular RAM because it takes CPU to compress and decompress packages that are swapped into it. This is one of the most debated features: many find that it helps things like the home screen load faster; others prefer to keep it off. Try it both ways and see what works for you. New versions of CyanogenMod also allow you to choose how much RAM compcache sets aside as virtual swap space, so you can play around with that as you so choose.

JIT: JIT is a Java compiler available in Android 2.2. Enabling it won't give you a big speed increase as far as small apps, loading the home screen, and other such niceties, but it will likely give you a big speed boost in intense applications, like games.

Lock Home in Memory: This is similar to the LauncherPro memory features we discussed above, as it attempts to do exactly what its name implies: keep your home screens in memory so that it doesn't have to keep redrawing them all the time. I'd recommend enabling this if you have the memory for it.
VM Heap Size: This is one of the more interesting settings. the VM heap size is the maximum amount of memory an application is allowed to allocate. Resource-intensive apps will require a larger VM heap, while simper apps don't need as much. You'll want to play around with this setting, but you should be able to tell after going through the other settings what setting you'll want here. If you allocating tons of memory to LauncherPro, or your have JIT enabled for resource-intensive applications, you might want to try 32M. If you're trying a more minimalistic approach to everything, you might find 16M or even 12M boosts the speed of your phone considerably.

With all these settings, try changing just one at a time and see how your phone responds over the course of a day or two. Everyone's settings will be different; there is no one size fits all here. Depending on your phone, the apps you use, how you've set up your home screens, and other tweaks you've made, your phone will respond differently to different settings. So, if you're dedicated to messing around with them, go for it—otherwise, you'll probably just want to leave them at their defaults (which are set on a per-model basis, for what it's worth). Also note that if you start messing with these settings, you never know what might happen, so many developers won't let you submit bug reports if you've changed the defaults. And, of course, always always always make a backup.
There's no doubt some of these tips are easier than others, but no matter who you are, there should be some tweaks here that help you out. While everyone's phone is different, it's likely many of you have found certain tweaks more effective than others, too, so share your own tweaks and the results you get with the above with each other in the comments.


Sincerely
H-M